Translations: "Spanish" |
HOME LAB PART 5: The Ultimate Small Form Factor Server for Home Lab
Overview
Introduction
Today I'm going to share the result of my experience building my home lab. As mentioned in my previous post as a spoiler, I shrank my setup even more and ended with a Mini ITX system bringing together two worlds: "/r/sffpc/" and "r/homelab/." Also, as you may guess from the header, I moved my setup from Intel to AMD for the CPU, and this is also my first setup using AMD.
Just as a reminder, this is the group of criteria I follow for my home lab server:
- RAM Capacity
- VMWare compatibility
- Power Efficiency
- Space
- Noise
The first four ones I have them covered using Supermicro SuperServers, especially the product line with embedded processors like the Xeon-D. The noise has been taking care of using the almighty Noctua Fans.
However, as mentioned in my previous posts, the 2100 series of Xeon-D brings some of their new capabilities with a cost, one of them is more heat. Because of this, I decided to add new criteria: "Thermals Efficiency."
To better understand this, after moving from the Xeon-D 1500 to the Xeon-D 2100 series, the TDP requirements increased, and what is TDP?. The thermals for the CPUs are measured by TDP or "Thermal Design Power," which means the amount of heat a CPU generates and a cooling system must remove. In this situation, current fans for 1U form factor in the low noise category are not enough for certain levels of TDP, especially when the CPU cooling is passive as it happens with the Xeon-D 2100 series in the 1U chassis.
Migration options
I went back to research more about this and found two options:
Custom water cooling
I found a reference on Reddit about that:

But I don't have previous experience working with water cooling systems. And where I live, access to the needed materials is very limited. Also I found this video from another of my favorites YouTube channels that shows how Noctua CPU Coolers can equal or beat the Liquid cooling setups:
Change the form factor from 1U to a tower
And this is to achieve two criteria: thermal and noise; however, the space usage criteria are in danger.
I choose this option instead of the water cooling, and during the research stage, I came along several resources, from Forums, Reddit, and YouTube Tech channels. I spent many hours looking into alternatives and reading other user's experiences.
At this point I was considering the NZXT h510i case:

Mainly because it supports the size of the motherboard I found I have in my current server. But, still, I wouldn't say I liked the idea of the full-size case, and I found about the Mini-ITX systems, then I spent too much time on this YouTube channel: Optimum Tech. This channel's content is just amazing, this is by far one of the best YouTube channels that cover Mini-ITX systems, and he also considers, among other things, two important factors: temperature efficiency and noise. Lucky for me, he put together a video with the best cases he reviewed.
Change from Flex-ATX to Mini-ITX
After watching this video, I decided to sell my current setup again to build a new one. The good part is that I only needed to replace the motherboard as the CPU is embedded and reutilize the RAM and disks.
The natural choice would be to go with the X11SDV-8C-TLN2F
However, at least from the general specifications:
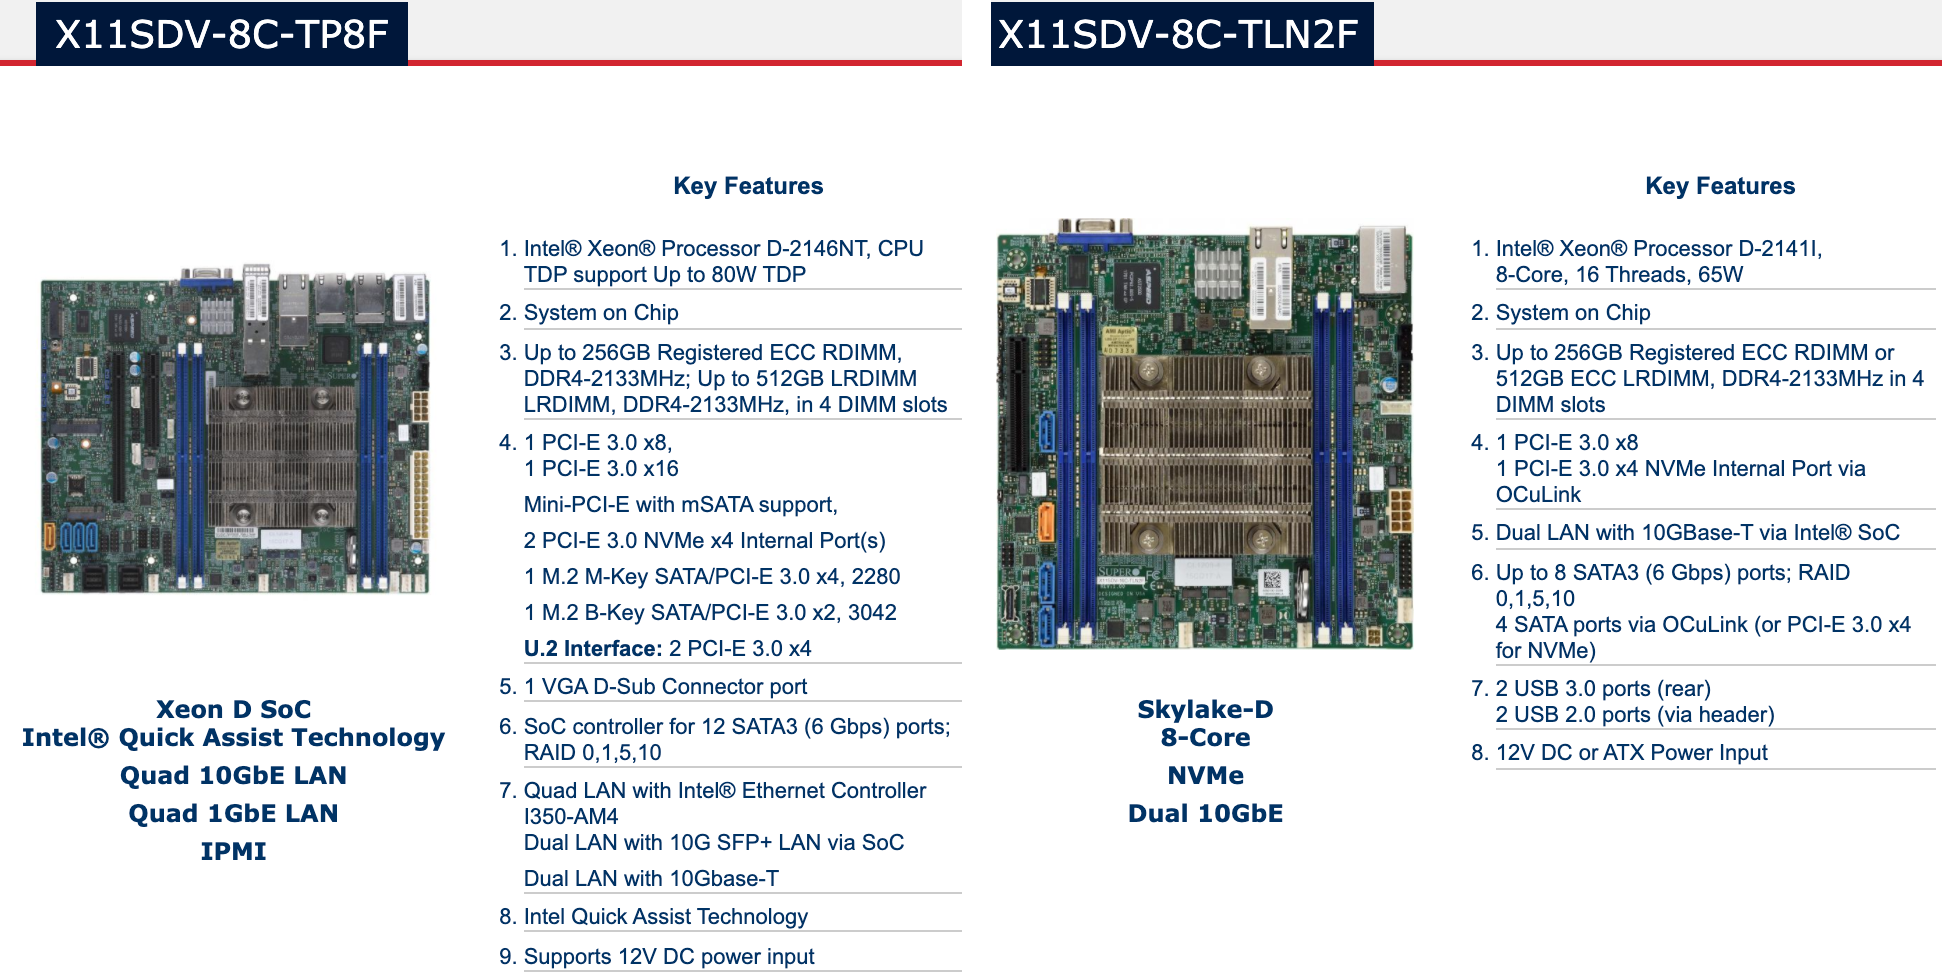
The move from the Flex-ATX motherboard to the Mini-ITX motherboard it had some compromises like:
- 4 x 1 GbE ports
- 1 x PCIe 3.0 x16 slot
- 2 x NVMe x4 internal ports.
- Intel Quick Assist
Features that I didn't mind losing. And the benefits besides the fact now I can use a Mini-ITX case, could be that the TDP is lower, which is excellent.
From Intel to AMD
Then while reading the site ServerTheHome I found this post Supermicro M11SDV-8C-LN4F Review AMD EPYC 3251 mITX Platform, and this AMD EPYC processors are the response from AMD for the embedded platform market agains the Intel offering of Xeon-D. And let's face it AMD has been doing a great job with the launch of their desktop/workstation procesors with Ryzen and ThreatRipper and and the server procesors with EPYC.
The launch of the AMD EPYC 3000 processors was back in Febrary of 2018 and they posted this comparation against the Intel Xeon-D 2100 series:
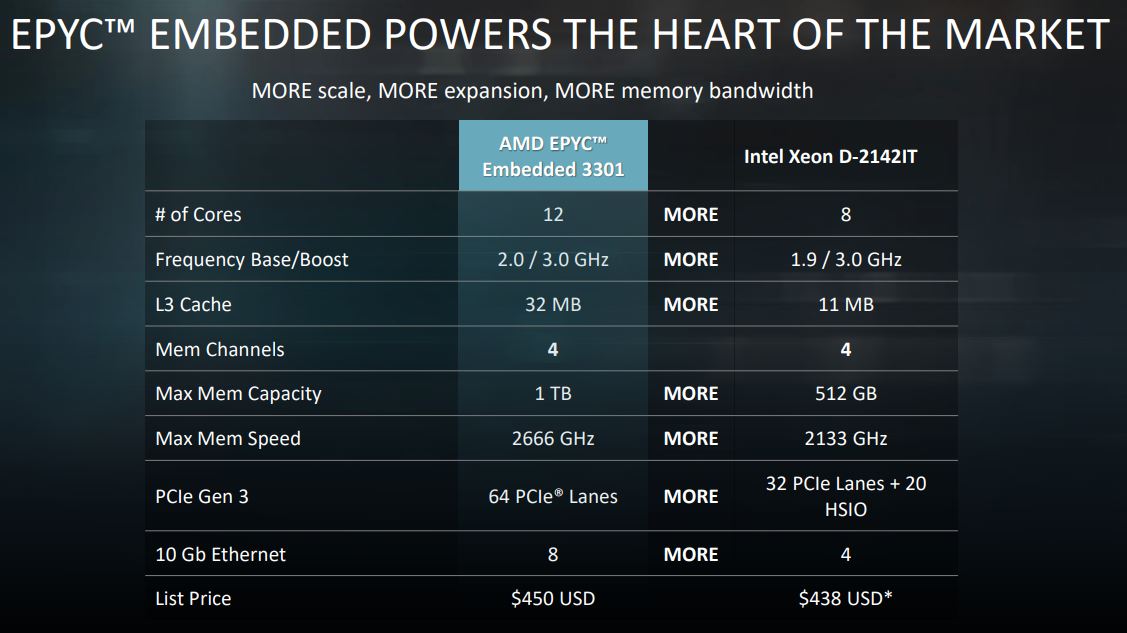
I have to blame my current employee for making my mindset into More Performance!, Better Features! With a very competitive price :), and this approach is what I feel, that is what AMD has been doing in the CPU market.
At that time, I found two motherboards from Supermicro to compare to make a decision, which are the M11SDV-8C+-LN4F based on the AMD EPYC and the X11SDV-8C+-TLN2F based on Xeon-D, both of them have 8 cores and 16 Threads, and both are the variants that include an active FAN for the CPU cooler. Supermicro only offers the AMD EPYC 3251 as the top of the line option, even if other CPUs with more power exist, Supermicro doesn't provide them. I found that ASRock has a motherboard using the AMD EPYC 3451 that has 16 Cores and 32 Threads, which of course, are more expensive and impossible to find one in stock at the time I was looking to buy a motherboard. I even sent an email to ASRock, but I never got an answer; kudos to Supermicro that always answer even to end users like me.
This is a quick comparison between the two motherboards:
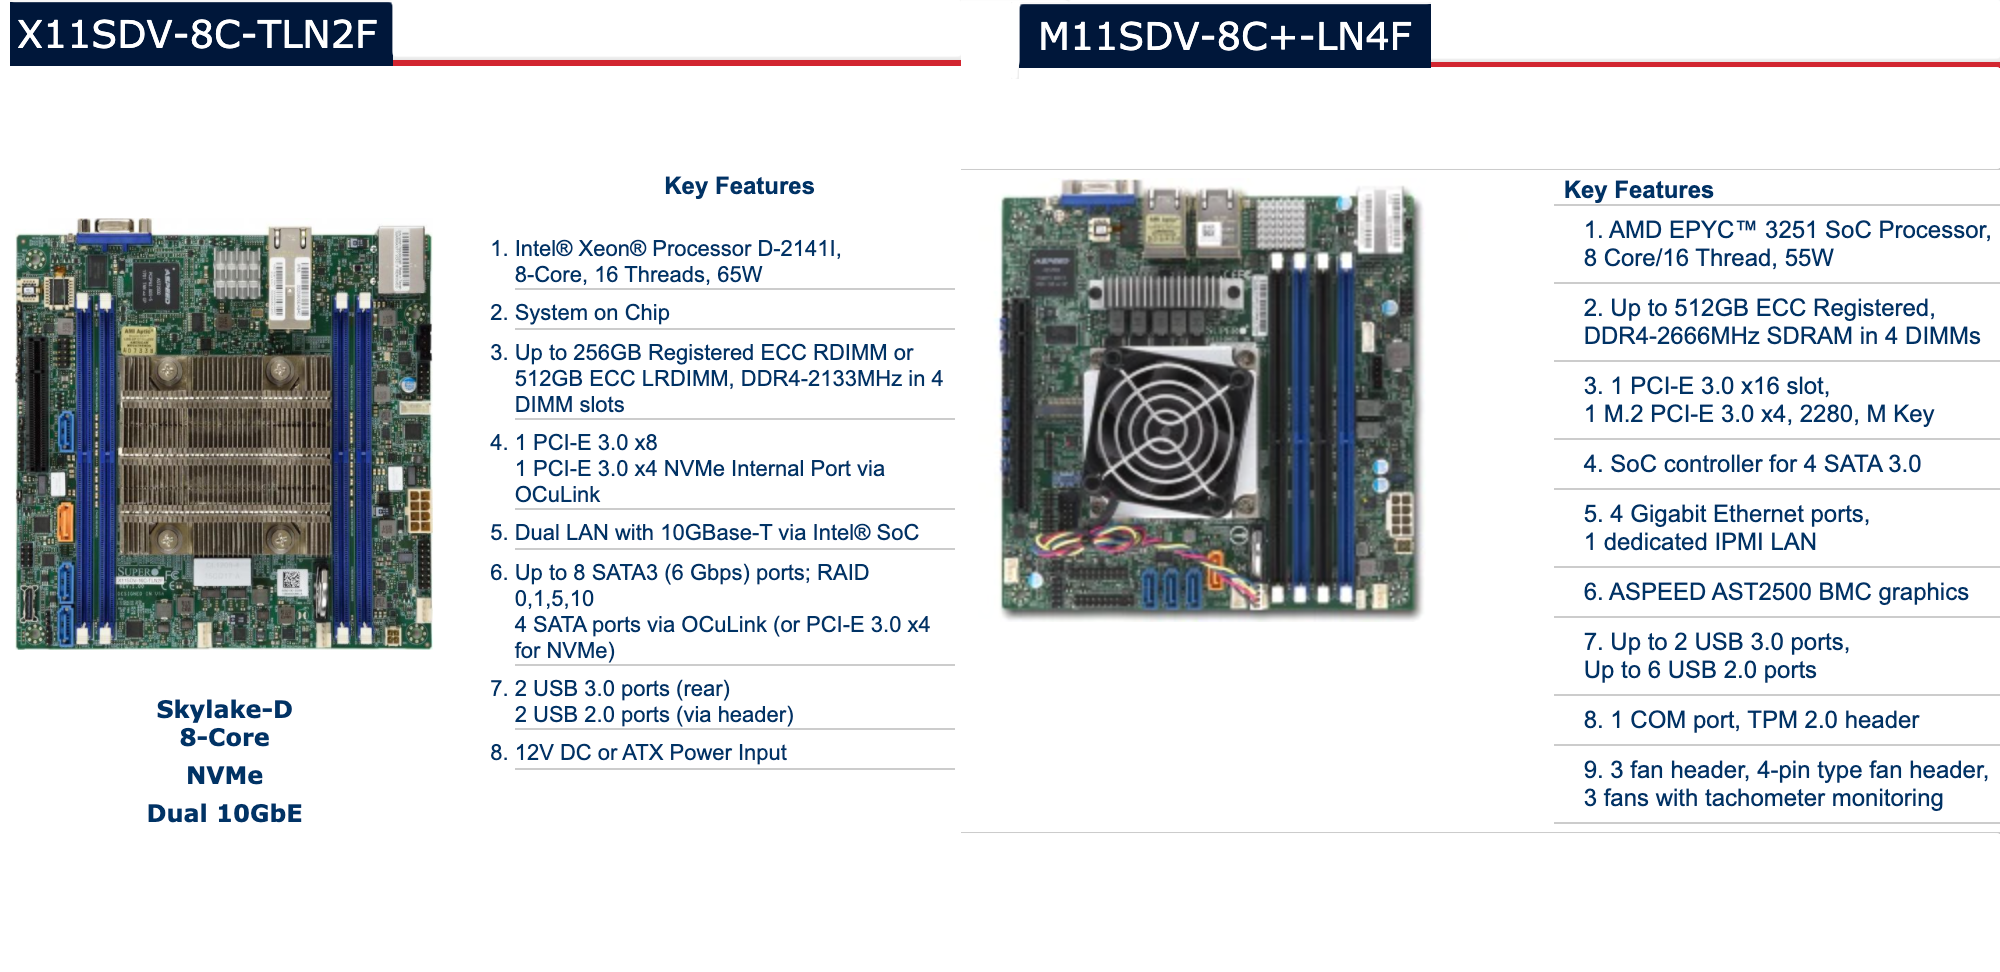
The main differences I can highlight are:
- EPYC motherboard is rated at 10 TDP less than the Xeon-D motherboard.
- EPYC motherboard doesn't have 10G interfaces, which I don't currently need.
- EPYC motherboard have a PCIe x16 vs the PCIe x8 of the Xeon-D motherboard.
- EPYC motherboard has less SATA ports, which I don't currently need a lot of them.
- EPYC motherboard does have a M.2 PCIe interface for NVMe disks which I actually use.
Then my last concern was about compatibility, so I sent an email to Supermicro, and they were kind enough to answer, and I quote:
We don’t have VMWare OS compatibility officially certified by VMWare. But the M11SDV-8C-LN4F is able to install ESXi 6.7 without any issue.
So I decided to bet on AMD with the M11SDV-8C+-LN4F motherboard from Supermicro. Then it was time to decide what Mini-ITX case use for this setup.
Choosing the Mini-ITX case
After research about 10 options for cases I ended with this two in my short list:
Louqe Ghost S1

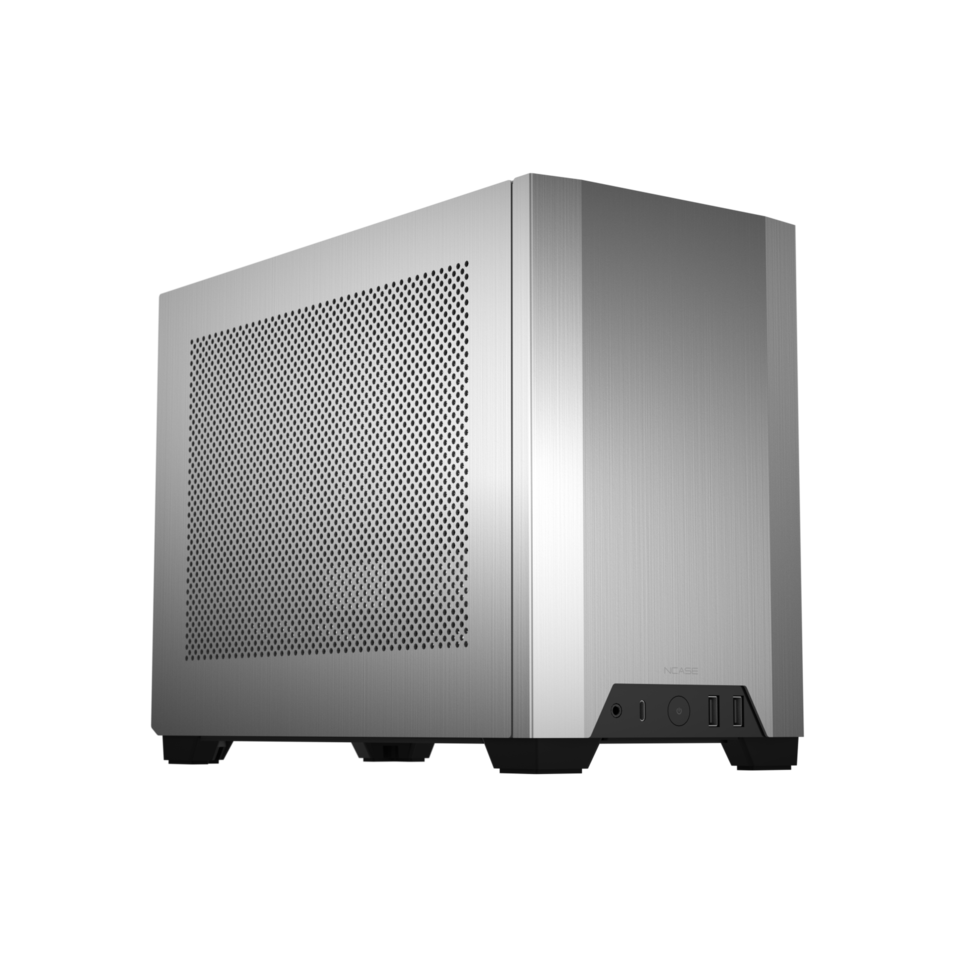
NCase M1
The Louqe Ghost S1 was my first choice as it was slightly smaller, but I had one main concern about the internal layout, which is what is known as a "sandwich layout." this splits the chassis layout in two and uses a PCIe riser for the GPU like this picture:
But I don't plan to have a GPU in this system, and that layout compromises the CPU heatsink height, which based on the specifications from their website:
The maximum height for the CPU heatsink is up to 66 mm. I contacted Supermicro again, and they sent me this information:
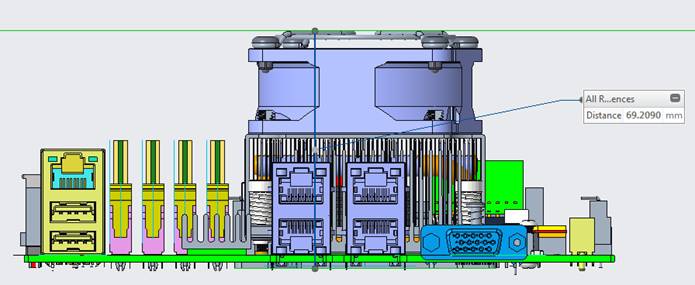
The height of the CPU heatsink with the stock cooler is 69.2 mm, and at the time, I was looking into a CPU cooler and found the Noctua NH-L12, which is rated as the best CPU cooler for this case. Still, it was discontinued and hard to find, the new review is the Noctua NH-L12S, but the height is 70mm. I found some references of people bending the CPU cooler to fit into the case, but I didn't feel comfortable doing that. Then, when I was writing this post, I found that back in Jun of 2020, Louqe and Noctua presented the reissue of the NH-L12 as a special edition for the Ghost S1 case, too late for me.
NCase M1 FTW
I discarded the Louque option and researched more about the Ncase M1; this case's history goes back to 2014, where it was the first crowdsourced Mini-ITX case. Some say that is the case that originated all this movement of small form factor cases. Six iterations later and after watching the review of Optimum Tech:
I decided to go with this case. The issue was almost impossible to get it; lucky for me, the creator announced a new batch that would be available for pre-order. And I was monitoring everything, Reddit, and the SFF Forum . Finally, one day in the morning, I saw a comment that the official website was open, and I was lucky enough to place the order. Two months later, I got the shipping notification, and it arrived in January.
Sadly, Peru's postal service is not the best, and the package was seriously damaged, and I found that one side panel had a dent. I reached the customer service and sent some photos of the damaged side panel and the package. They were kind enough to send me the replacement free of charge. This is what I call excellent customer service. They even used FedEx that delivered the replacement part in one week and perfect shape.
The quality of this case is just outstanding. I have never seen anything like this before. The case worth every dollar. Because let's face it, USD 275.00 (Including shipping to Peru) is not cheap, but the care on the details in the design, the quality of the aluminum finishing, made me understand why even with that price, the demand for this case was so high.
The next step was to get a CPU cooler, as mentioned on their website: NCases.com, the Ncase M1 supports CPU Coolers with a height up to 130mm. I found two options with excellent feedback from other builds during my research, the Noctua NH-U9S, and the Noctua NH-C14S. Then, I found this post on Reddit where both coolers were tested and compared:

The results are that the Noctua NH-C14S has slightly better numbers for the maximum temperatures values, so this is the cooler I got.
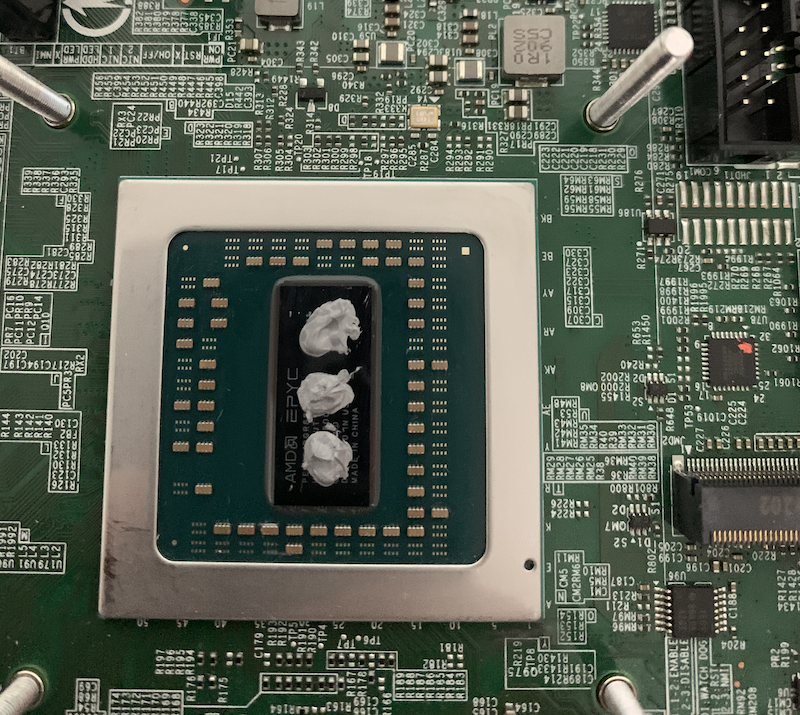
The next challenge was to put all this together. After checking the motherboard, removing the stock fan, and cleaning the thermal paste, the first surprise was that the CPU doesn't have a heat spreader; it exposes the CPU die directly. And something expected was to find that the socket is not standard, so the CPU Cooler mounting kits will not work with this.
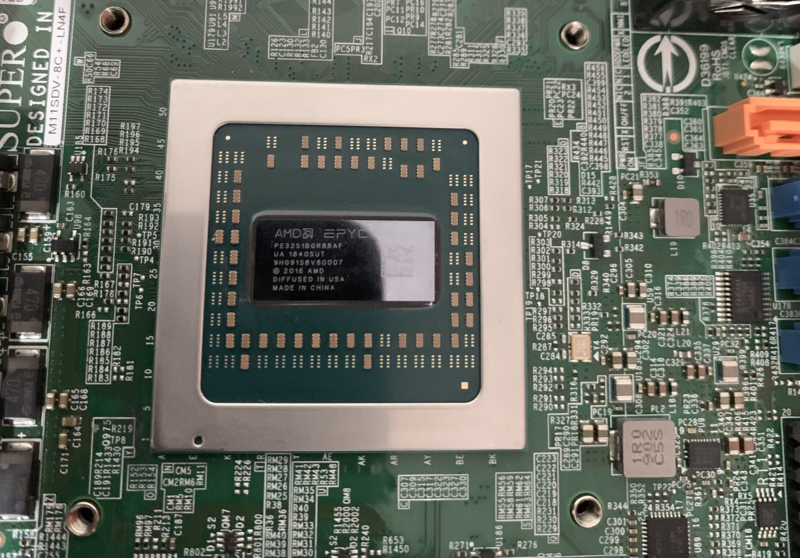
AMD calls the socket type: SP4r2, and even to the date of writing this blog, an aftermarket CPU cooler for this socket is still non-existent, only the OEM from Supermicro if you choose the motherboard with passive cooling first and then you want to get the CPU cooler with active cooling.
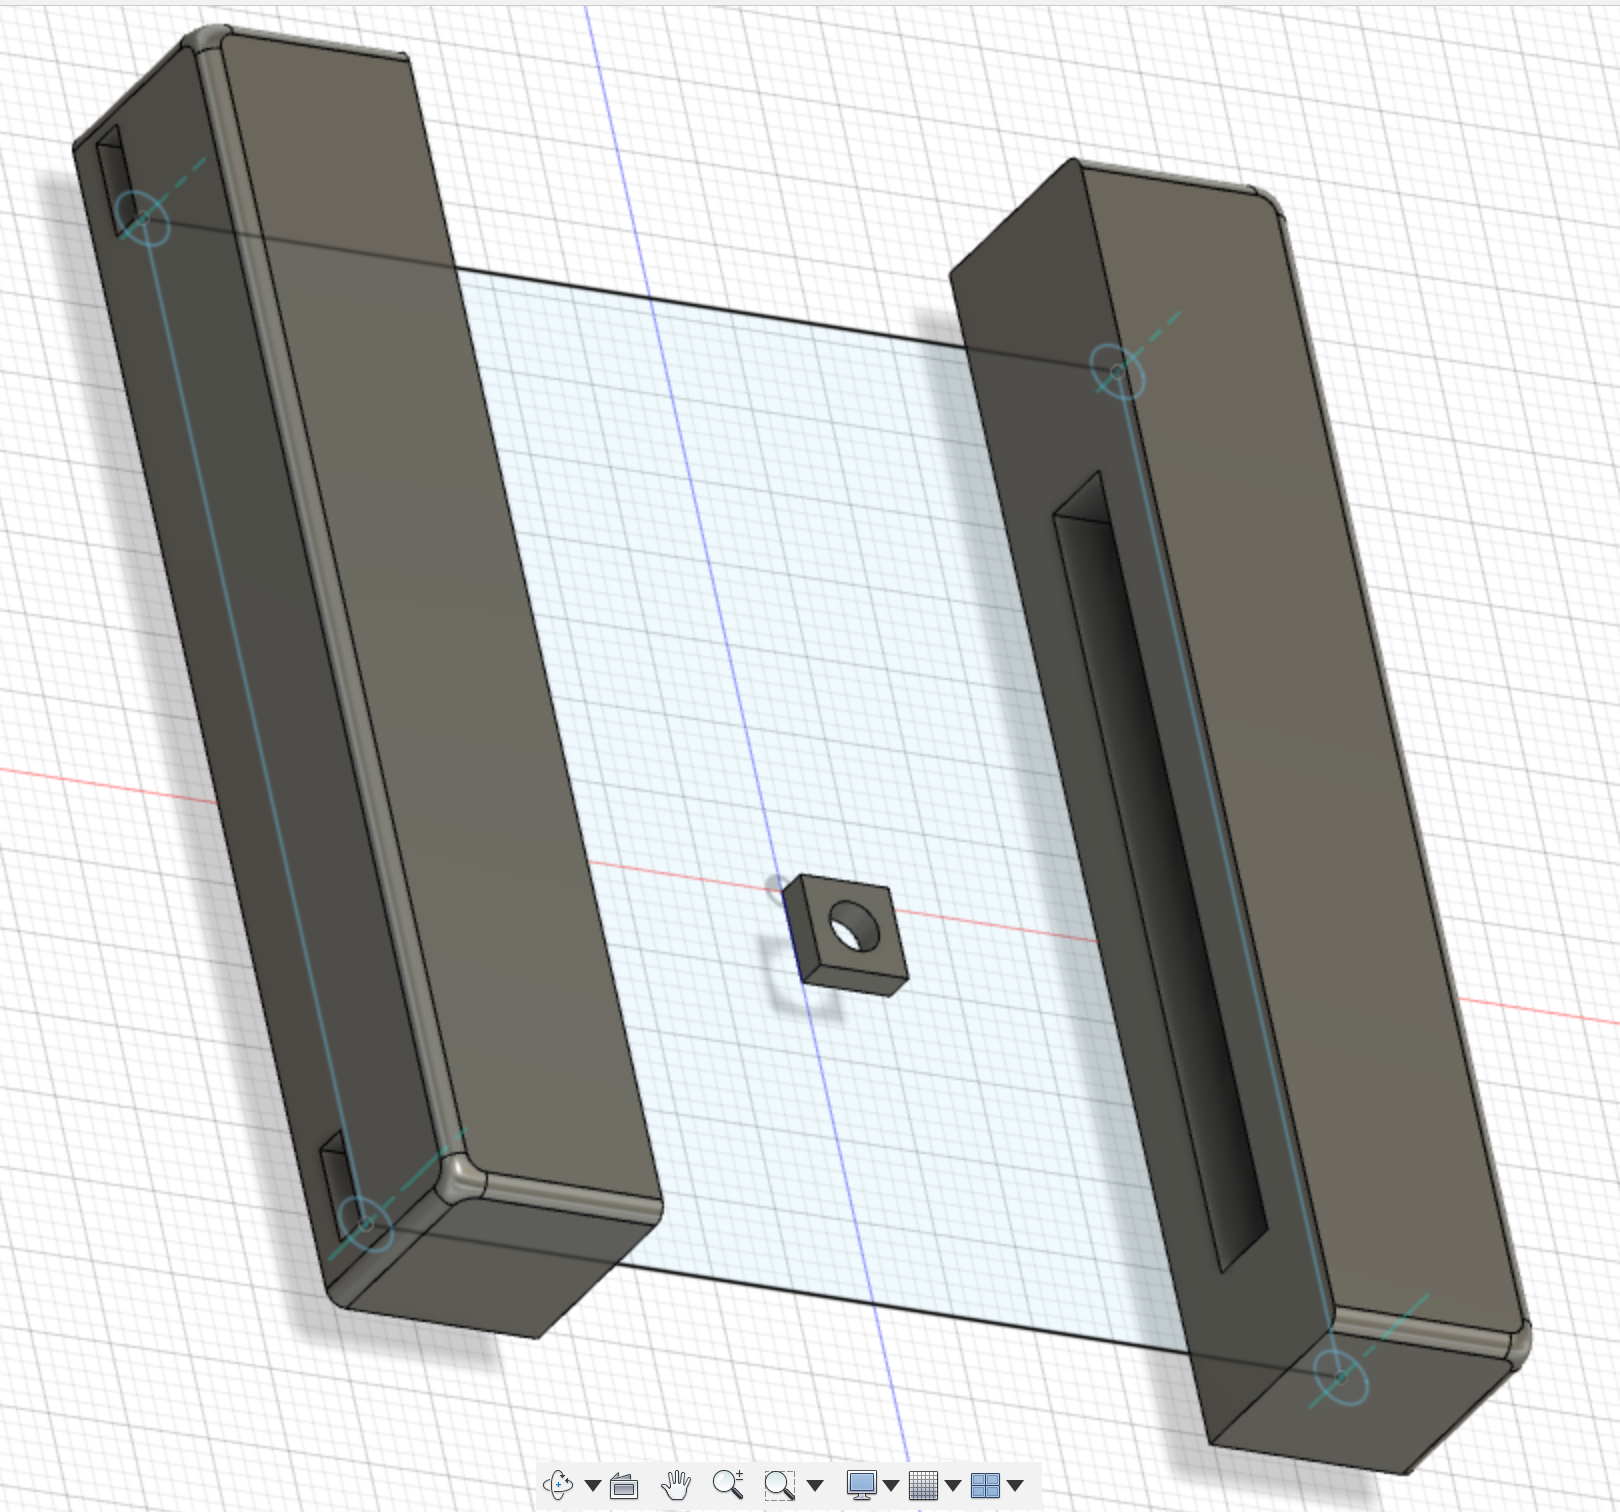
While searching for more information, I found this message at ServeTheHome Forum where the user "Slavearm" posted a custom made 3d printed brackets for the Noctua NH-L12S he made to make it work with the X11SDV motherboards series of Supermicro that uses the rPGA988 socket. I liked that solution as with some changes; I could adapt the brackets to fit the M11SDV motherboard series. This guy was very kind and sent me a copy of the source files of Autodesk Fusion 360.
A new issue: I didn't have any previous experience with 3D design and printing, so it was time to learn a new skill. And after an express training courtesy of searching on google, I figure out how to make the changes I needed to do.
As a reference, the original design can be found here
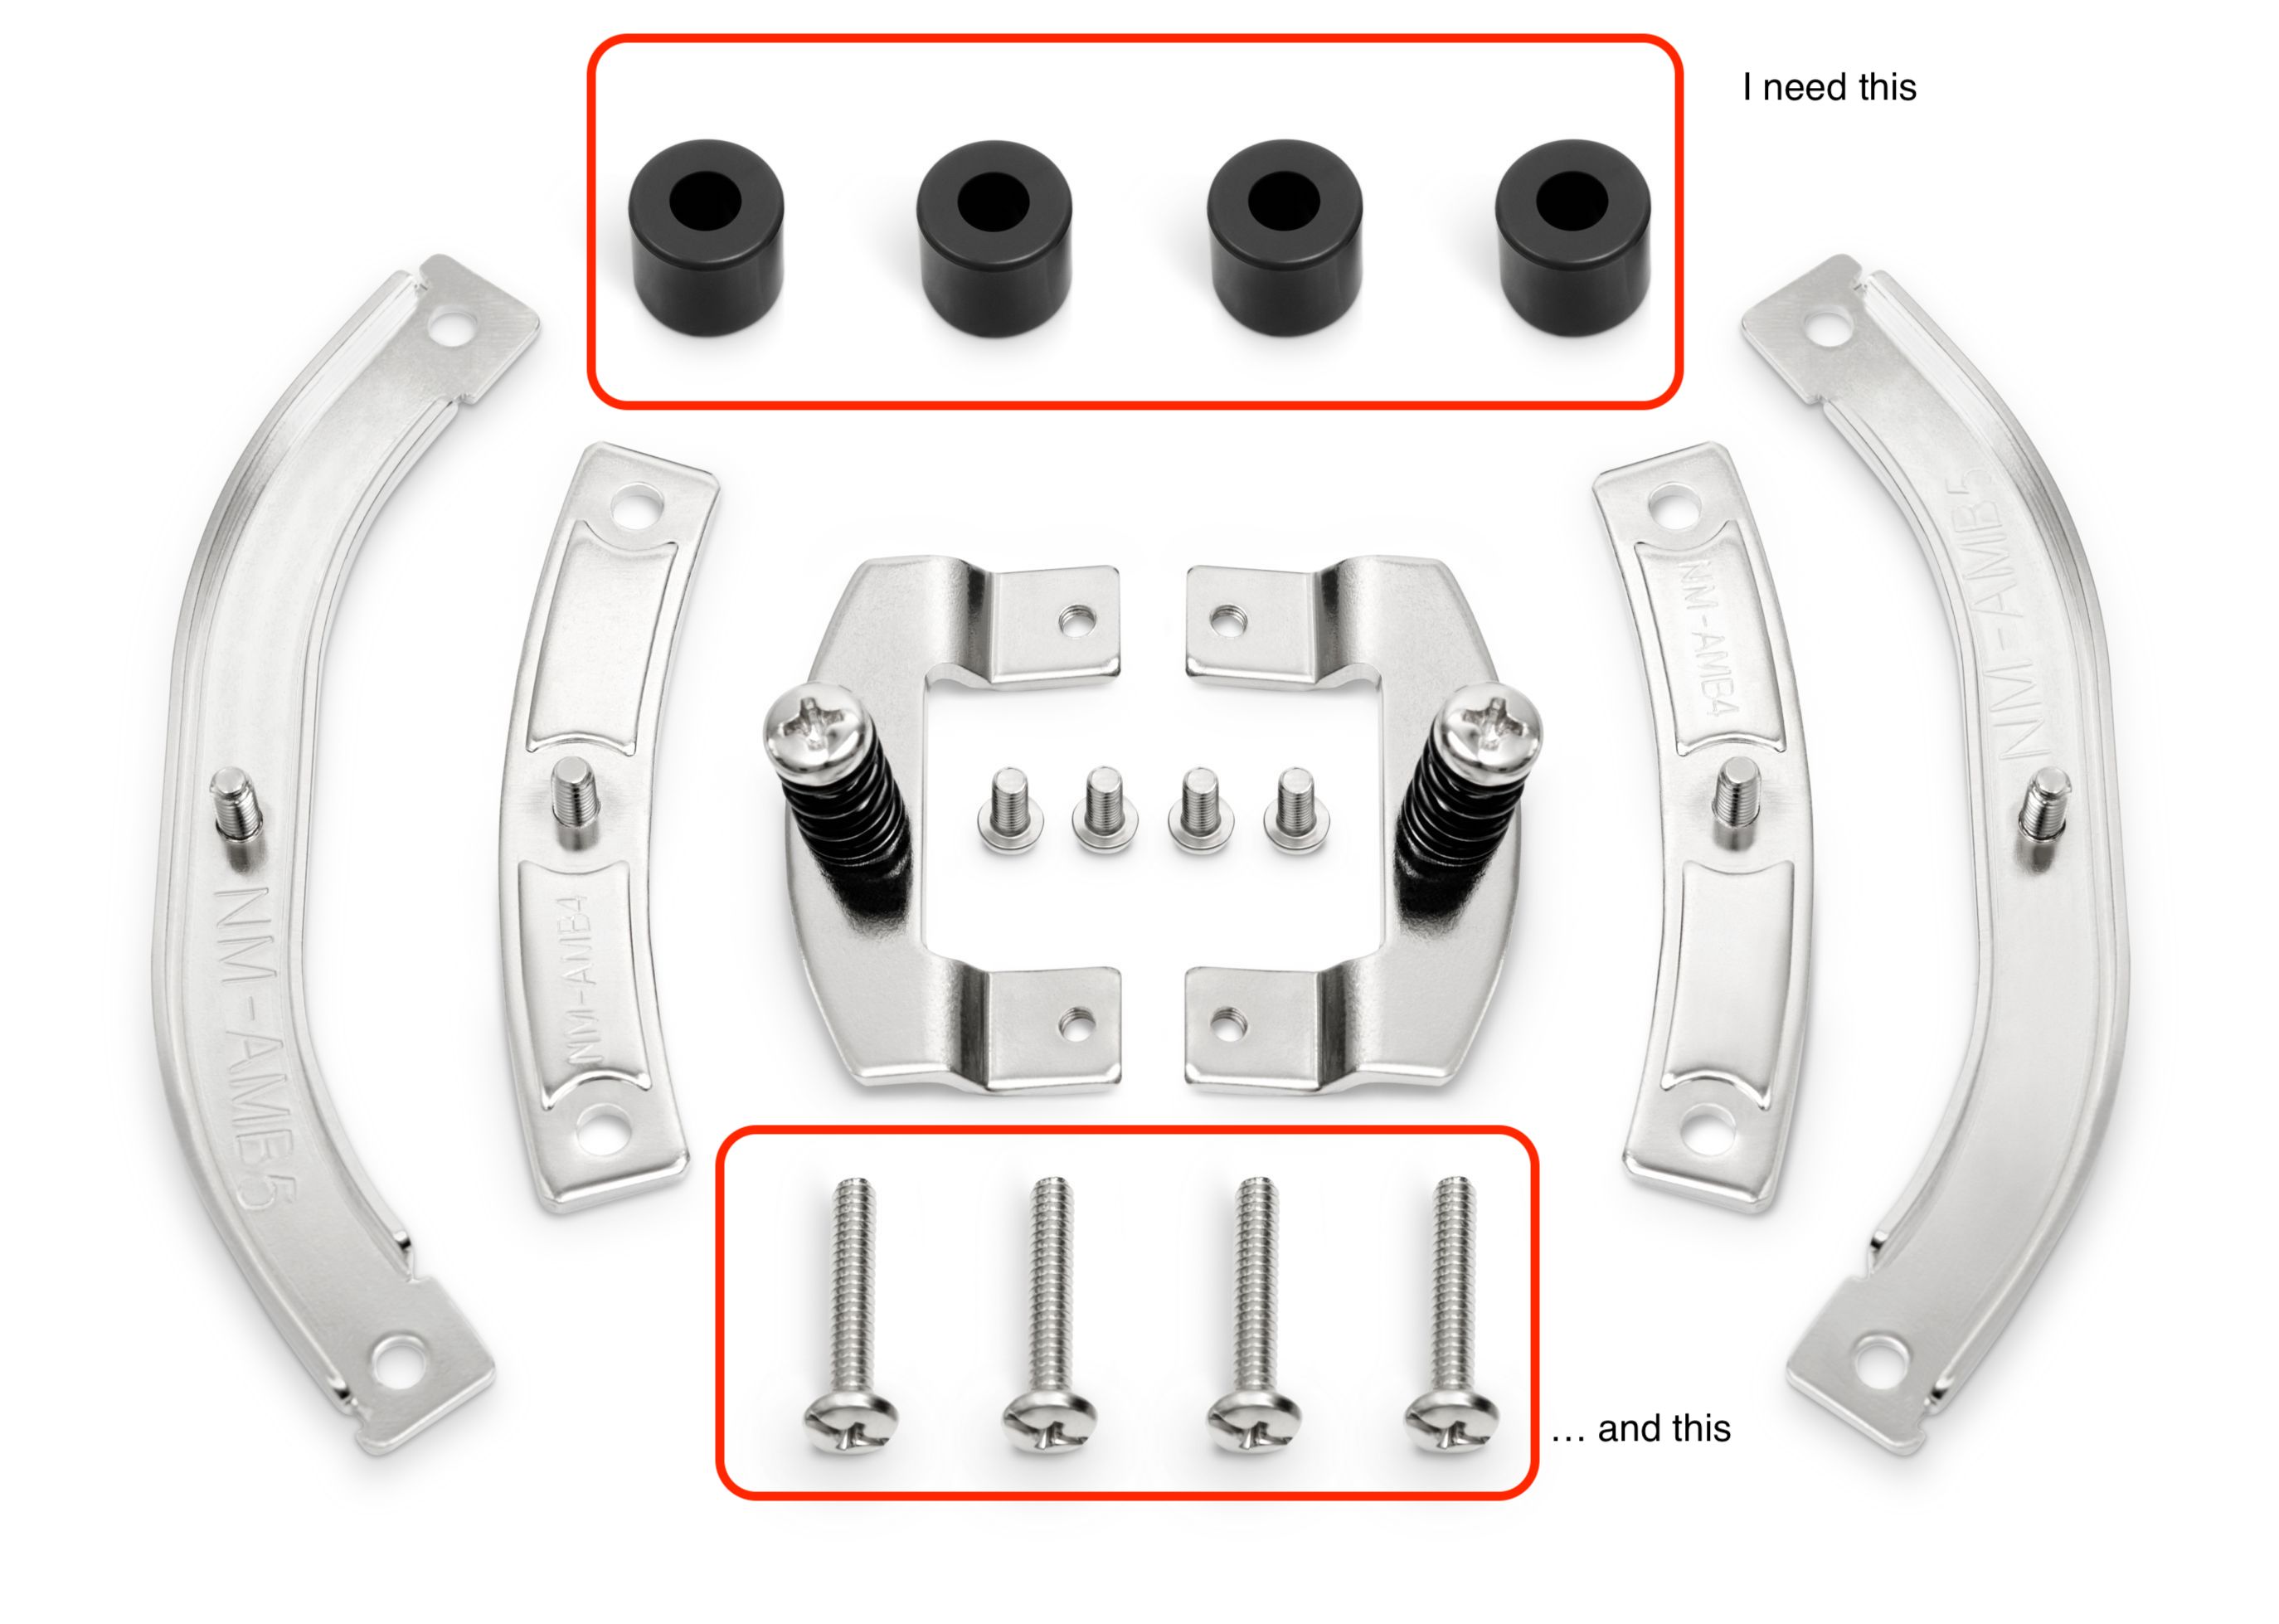
And the way these brackets are mounted uses a set of 4 x M3x10mm button head screws and 4 x DIN562 Thin Square M3 nuts. I went to many hardware stores, and I couldn't find those. I only found some websites from China that could send these items, but it would take months to arrive.
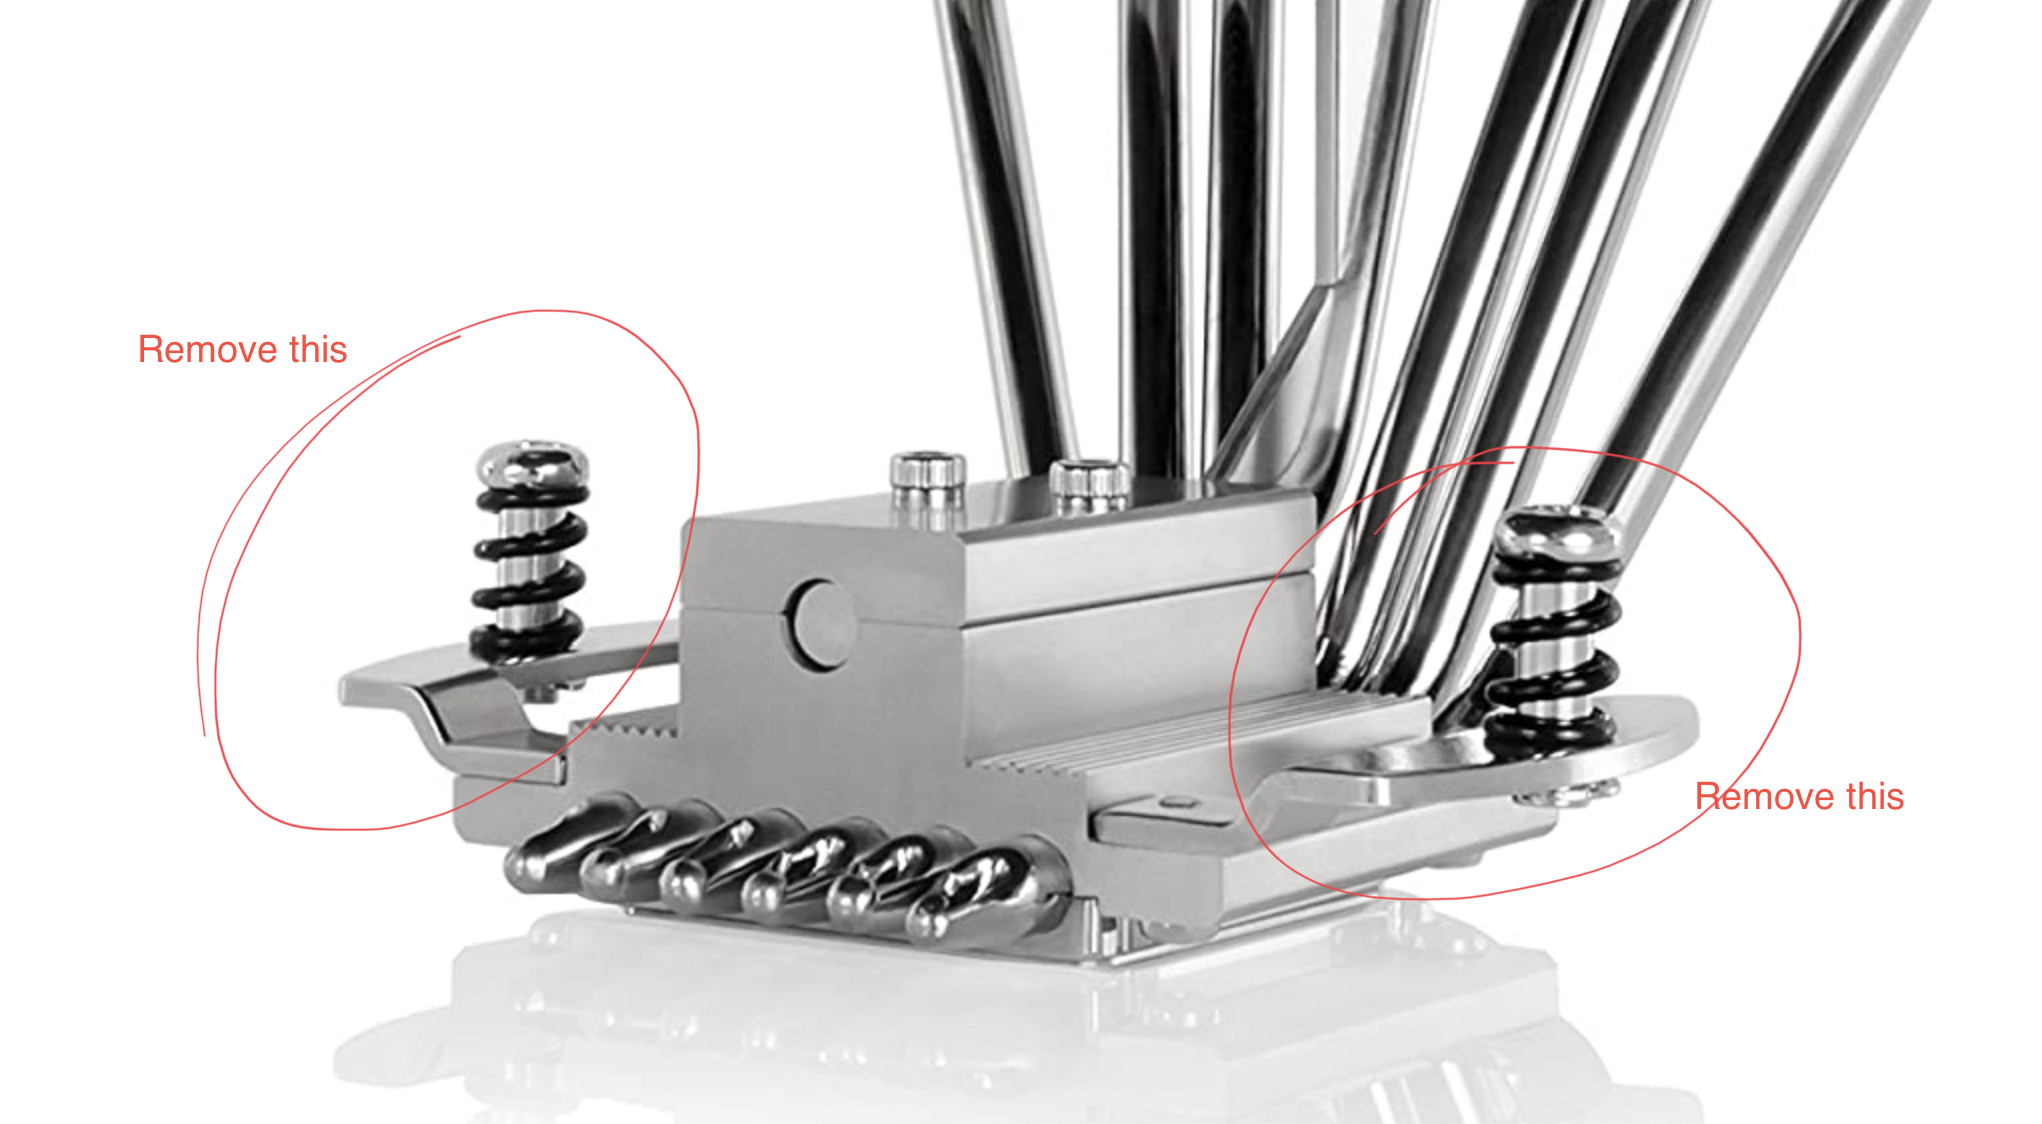
Because of this, I decided to use my newly acquired skills :) and I decided to change the 3D design not to use those extra materials, and then found in the Noctua NH-C14S box some items that I could use, like screws and thumbscrews:
And from the Intel's mounting kit:

Then I had to remove the two side handlers of the CPU cooler that makes it fit the mounting kit:
And this is how it looks while I was doing a fitting test to take some measures:
I don't have a 3D printer, so I had to search for local providers that could print the design first in PLA, which is the cheapest option I found, each print test cost me around USD 5.00, and after 3 test and changes, I felt happy with the result. And this is how it looks the 3d design:
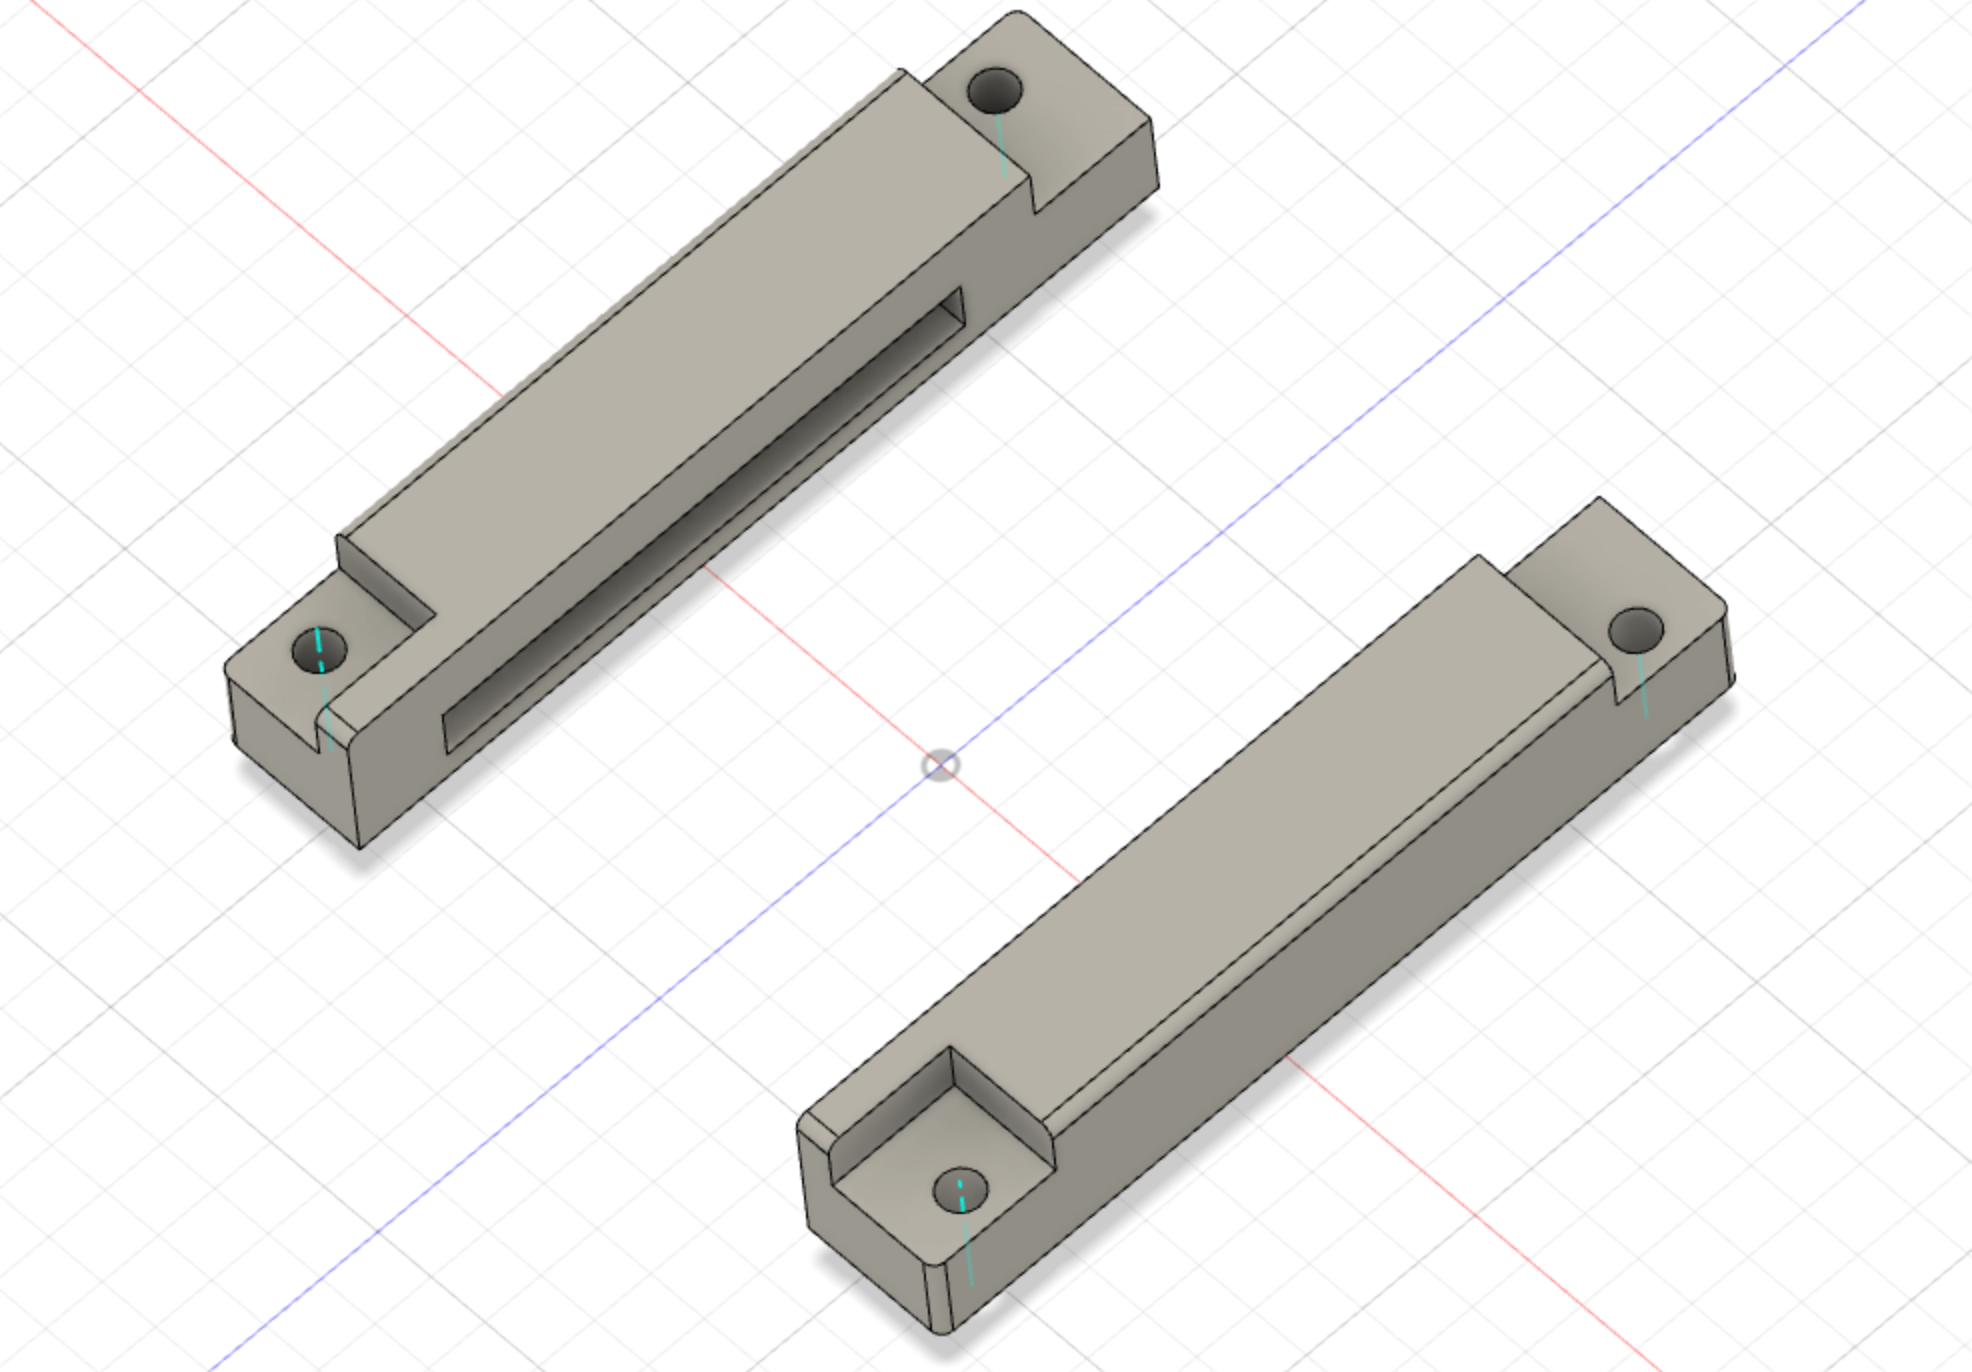
The 3D files can be found and used from this link to Thingiverse
Based on the original creator of the design's recommendations, for the final print, I used PC (Polycarbonate), which has more heat resistance than PLA. Heat resistance is critical as the contact with the CPU cooler can become too warm, and with the wrong material, this could have dangerous implications.
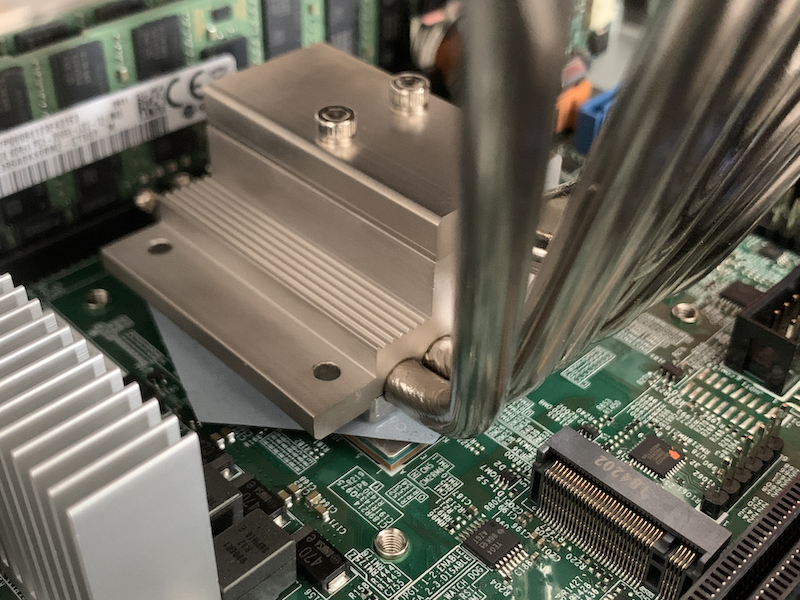
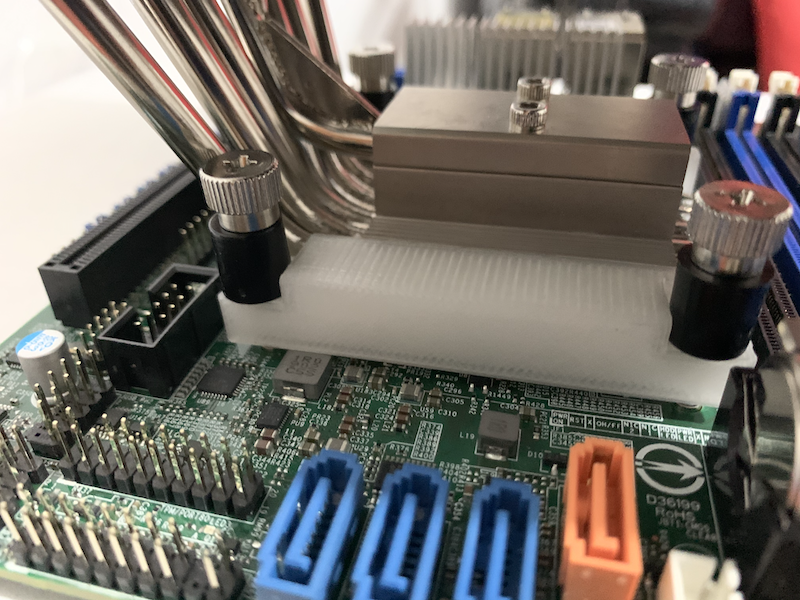
Time to install the CPU Cooler!, first I place the mounting screws like this picture:
I used the included thermal paste that came within the Noctua C14S box, which is the NT-H1, I know that the application could be better, but for now, it does the job :)
Then, I used the thumbscrews to secure the mounting of the CPU cooler, as shown in this picture:
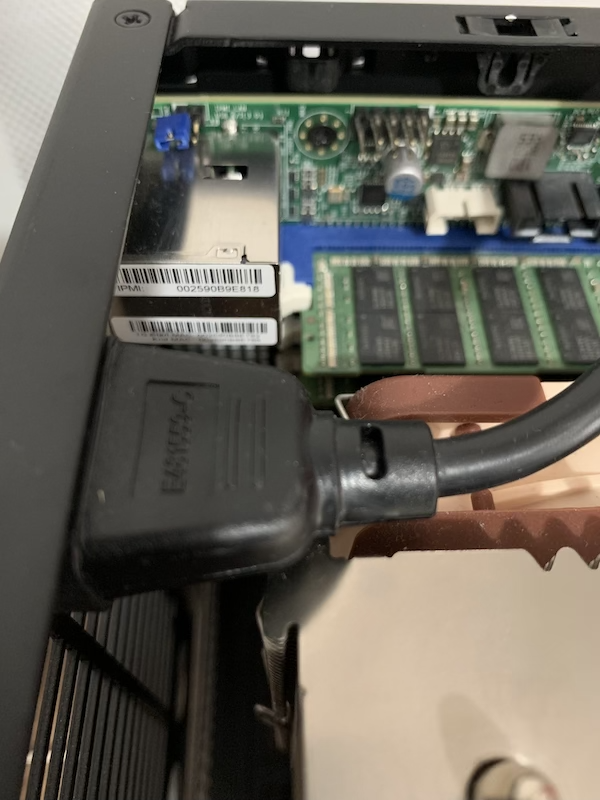
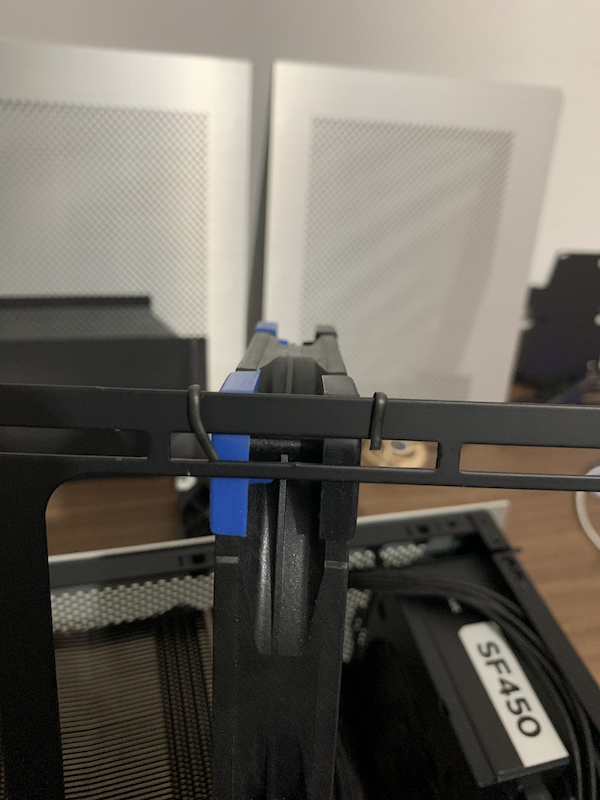
Also because of the height of the CPU Cooler I had to change the postion of the power connector, the case is very flexible to allow to change this kind of configurations when needed:
And even with that, I had to bend a little bit a corner of the heatsink to make it fit:
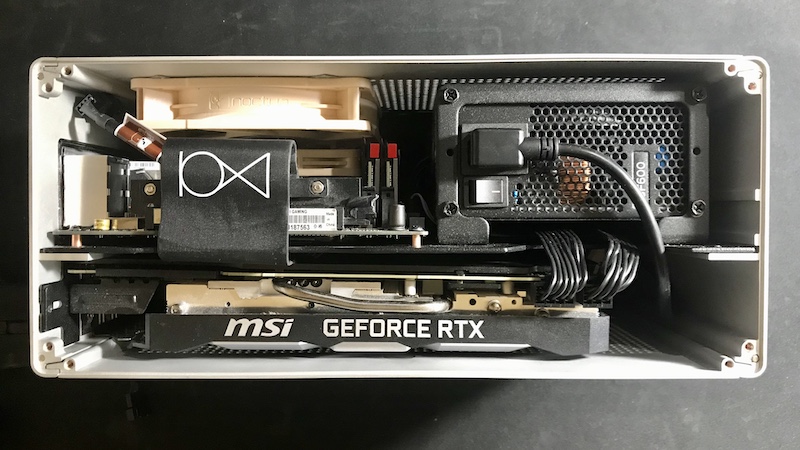
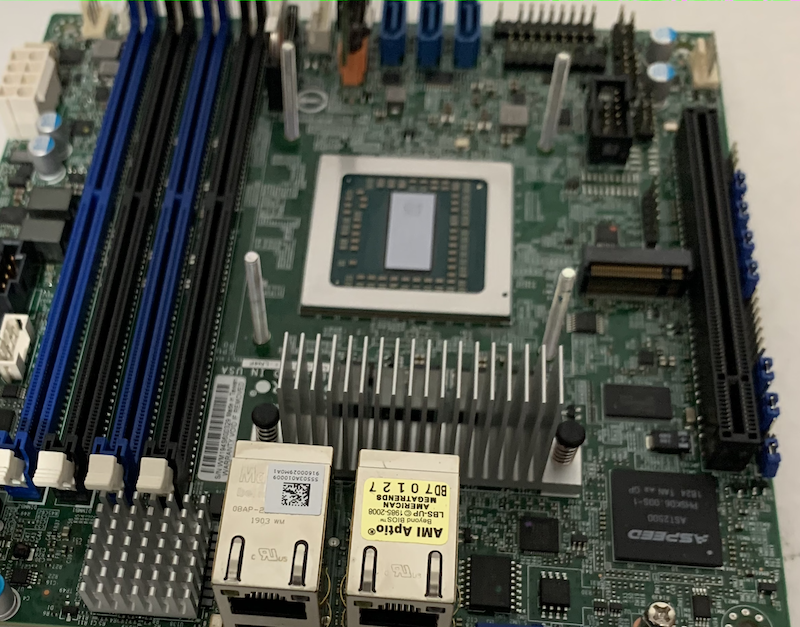
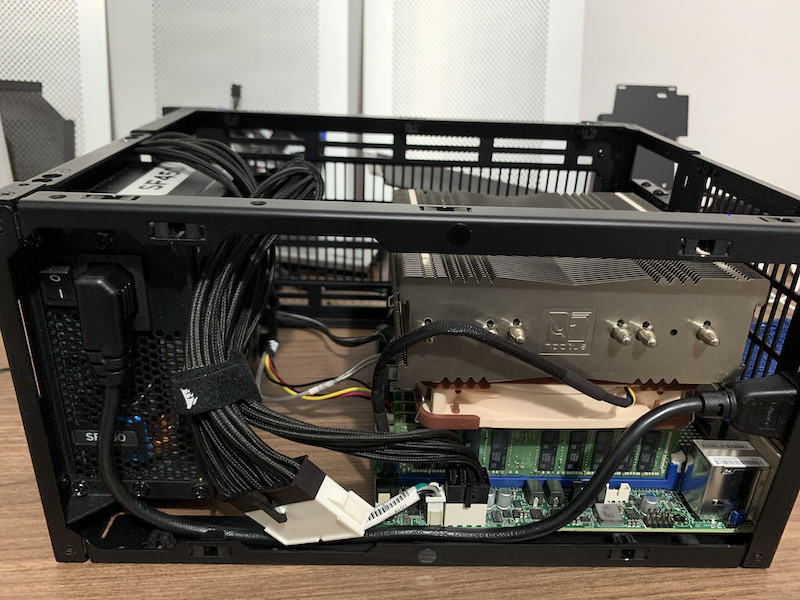
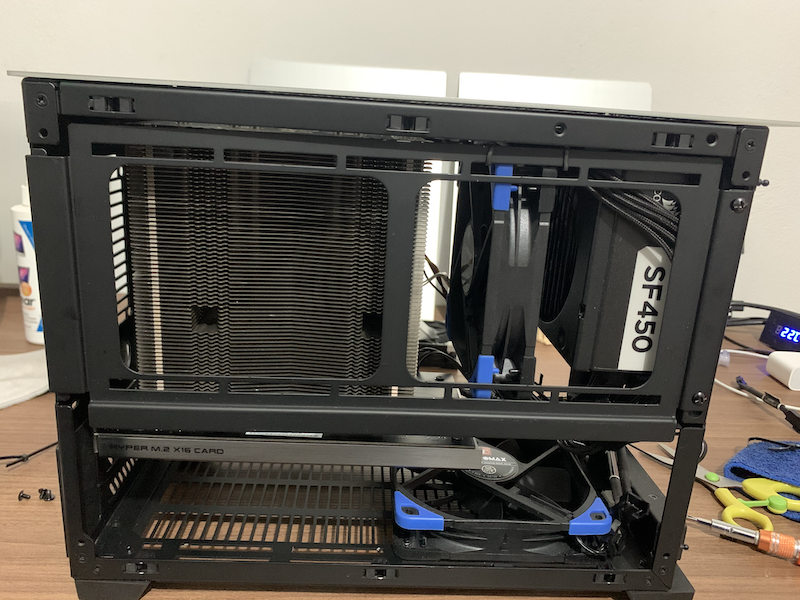
And this is how it looks from inside after install the PSU, RAM, CPU Cooler and make a quick cable routing:
I got a pair of Noctua NF-S12A Chromax and placed one in the bottom, pushing fresh air from bottom to top across the case. Then I have ASUS Hyper M.2 X16 PCIe 3.0 X4 Expansion that block the fresh air if I place two fans in the bottom of the case, I chose to use the second fan to push air to the other components like the RAM and motherboard.
Then to secure the fan with the internal holder, instead of design and print something in 3D, I spare no expense used the finest wire ties I could find:
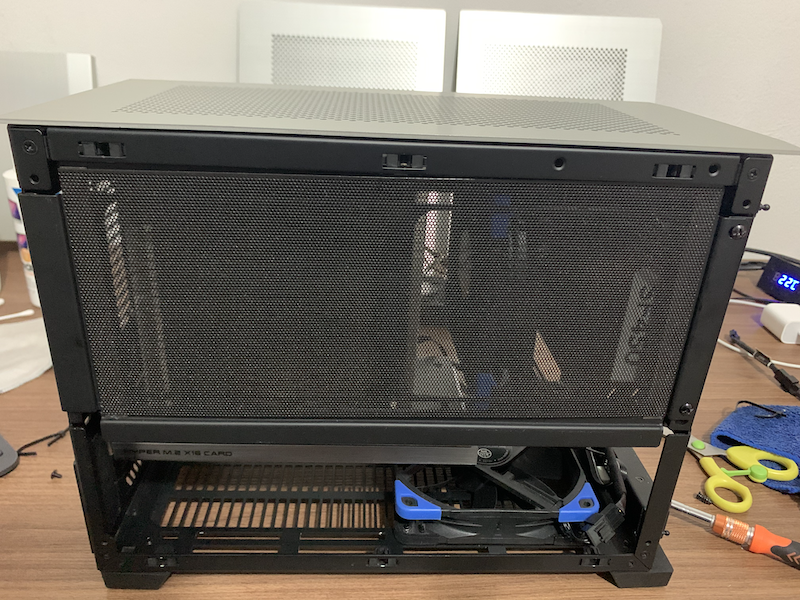
The NCASE M1 includes a antidust mesh panel that I installed:
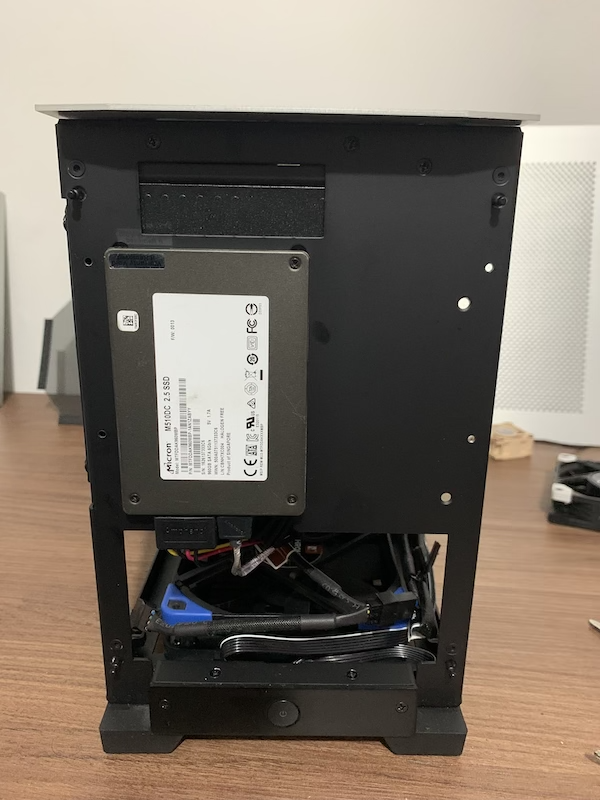
And I also added an extra SSD disk in the internal front panel:
Then is time to finish the building:
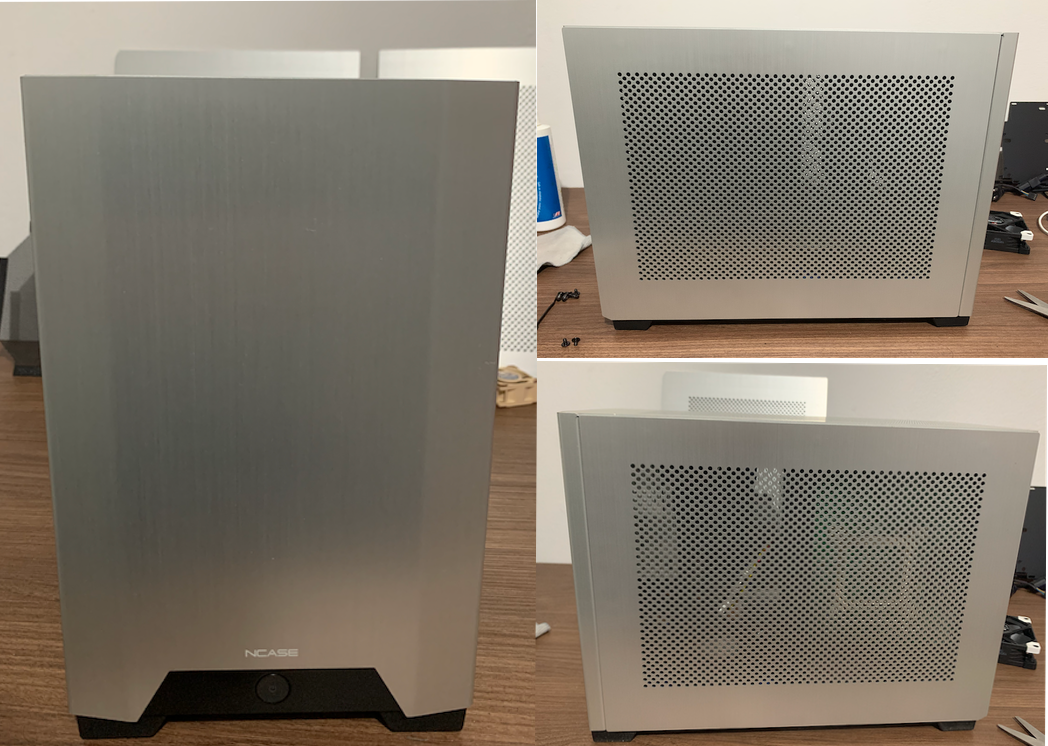
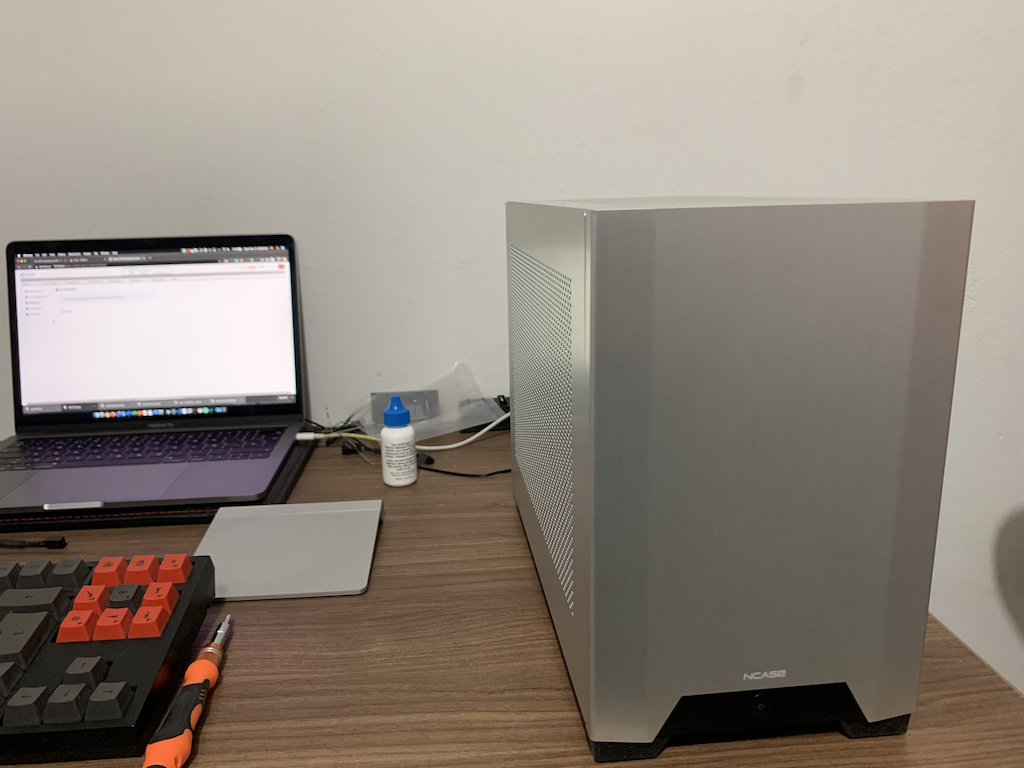
And so far this is how it looks:
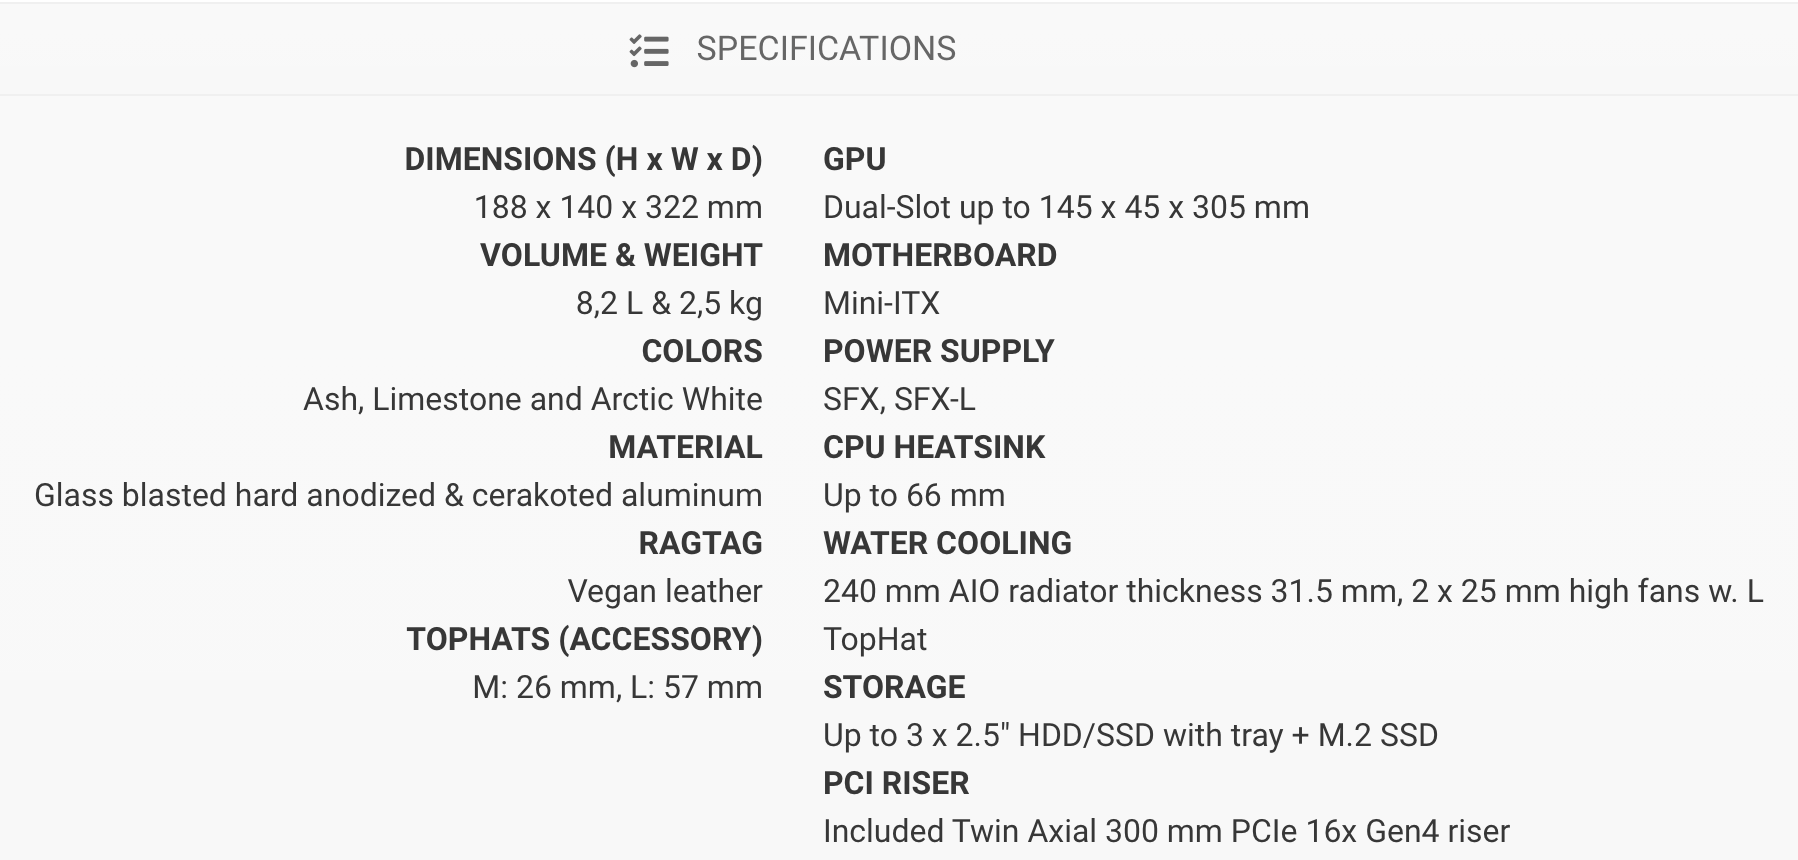
The final Bill of Materials of the Server:
- Case: NCase M1 V6
- PSU: Corsair SF450 SFX 80+ Platinum
- Motherboard: Supermicro M11SDV-8C+-LN4F
- CPU: AMD EPYC 3251 8 core and 16 thread
- CPU Cooler: Noctua NH-C14S
- Case Cooler: 2 x Noctua NF-S12A Chromax
- RAM: 4 x Samsung 64GB DDR4-2666 ECC/REG Load Reduced CL19 Server Memory Model M386A8K40BM2-CTD7Q
- Storage:
- Boot: Supermicro SATA-DOM SSD 64GB SSD-DM064-SMCMVN1
- Storage Adapter: ASUS Hyper M.2 X16 PCIe 3.0 X4 Expansion Card V2
- NVMe Storage: 2 x Samsung 2TB 970 EVO NVMe M.2 Internal SSD
- Extra Storage: 1 x Micron M510DC.
I ran some resource-demanding tasks to measure the processing capacity, and also to benchmark the overall temperature of the system, and these are the results:
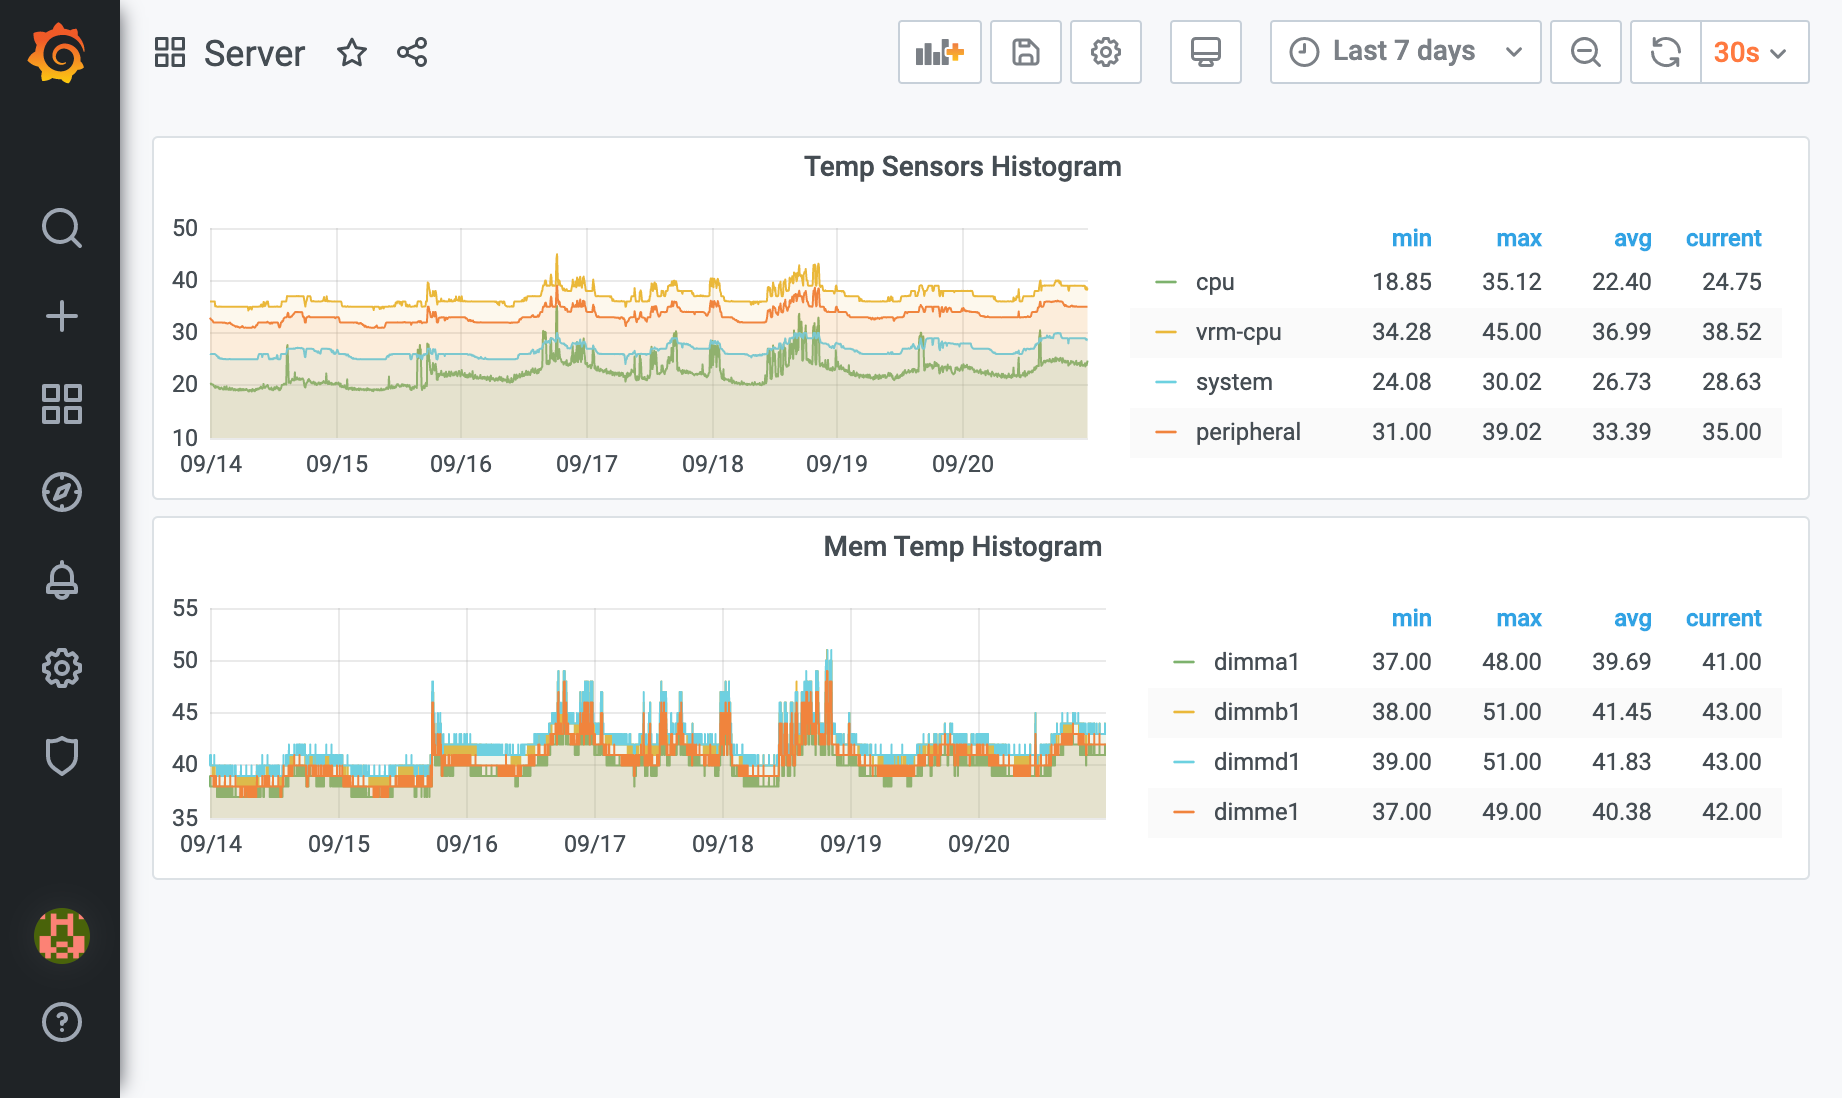
As you can see from the image, the lower temperature registry is about 18 °C for the CPU, and with a maximum of 35 °C, the room temperature during the test was 20 °C. Also, because of the FAN configuration inside the case, the RAM temperature is very decent too.
The FAN Configuration was the following:
- FAN1 (CPU): 1100 R.P.M
- FAN2: 700 R.P.M
- FANB: 600 R.P.M
And because of that FAN configuration, regarding the noise, the average level measured with an iPhone as I don't have a specialized tool to do this is 27 dBA, which is very quiet. My MacBook pro is noisier when the fans are spinning.
And for the power usage, I observed an average of 50W and up to 60W on full load.
Just a final thought, this setup can be also be done with the Xeon-D series. I made a bet to use an AMD CPU, and so far, I'm happy with the result. And the use case I have for it is to run vSphere nesting for NSX and the recent VCF 4, commercial APT Sandboxing, SIEM and SOAR solutions, among entire simulated Windows AD environments (endpoints, servers) for threat emulation exerciste.
That's all for now, I have a lot of pending stuff to publish, but I wanted to finish this blog post first.
comments powered by Disqus